Hi everyone, and thanks for stopping by!
I haven’t posted in *ages* and really needed something to get me out of my rut! So, even though it was painful, I decided to push myself and create something for the Papertrey Blog Hop.
This month’s challenge was all about tissue paper. Here’s the brief from Nichole:
“This month let’s focus on tissue paper! It has become one of the hottest trends in the paper crafting world and we want to see you take it on! Whether it is die-cutting it to make beautiful layered blooms, the faux silk technique, creating layered backgrounds or even delicate stitched pleated borders, we want to see you get creative! And don’t forget, your new stamps arrive lovingly wrapped in tissue paper each month, so these can prove to be “free & green” projects as well! Have fun and we look forward to seeing all of your projects!”
Well, she makes it sound so easy, but let me tell you, coming up with something *original* with tissue paper is a lot harder than it sounds! I finally settled on a Faux Silk technique, which is by no means original! But I’ve never tried the technique before so at least I gave it a go!
As soon as I thought Faux Silk there was only one set I could think of to use with it: Damask Designs. I figured that if it’s meant to look like silk it ought to use a pattern that may well be found on silk!
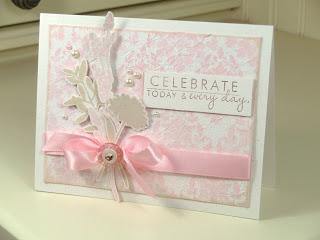
So without further ado, here’s what I came up with:
Well, I guess I don’t *hate* this card, but I wish I were more original!
I started with a piece of tissue paper that I cut down to 5.5″ x 4.25″. I used a piece of the tissue paper that every PTI set comes wrapped in (and believe me I have a lot of those pieces of tissue paper now! *wink*).
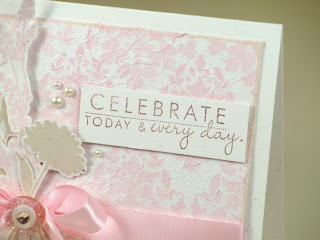
I decided I wanted the look really soft and as if the pattern was part of the ‘silk’, so instead of stamping on a piece of cardstock then creating the faux silk I stamped directly onto the tissue paper using Sweet Blush ink.
I then cut a piece of Rustic White cardstock to 5″ x 3.75″ and applied a generous layer of glue using a glue stick. I crumpled up the tissue paper really tight to get lots of fine wrinkles then placed on the cardstock with the stamped side down to give a slightly softer look. After pressing the tissue paper down and adhering the edges to the back I was left with a Faux Silk panel.
I wanted to give the panel a softer edge, so I inked the edges with my VintageTouch Tea Dye Chamomile ink. I then decided this was too strong and went over it with a little Sweet Blush ink. Then again deciding it was still too strong went over with Vintage Cream ink. Then *finally* went over one last time with the Palette New Canvas ink to end up with what I wanted. I told you this was painful!!
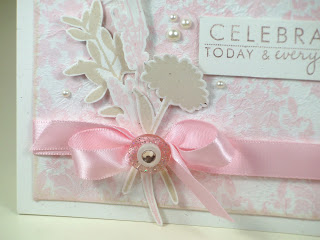
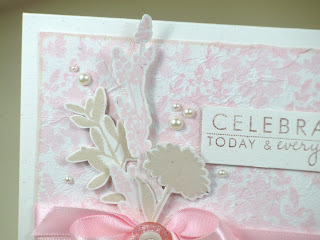
I knew I wanted a fancy bow on the panel so made one with Sweet Blush Satin. Next spent ages coming up with a button treatment to top off the bow. I settled on a Sweet Blush button with a lovely glittery rim, then after a lot of searching found a Vintage Cream button the right size, colour and appearance to adhere on top of it, then *finally* settled on a Champagne rhinestone to adhere on top of the button (this after several attempts with various colours and sizes of pearls and rhinestones, ack!). The buttons were adhered to each other and to the bow with glue dots, and I added another glue dot between the bow and the panel to give it a bit of support. The panel was then adhered to a Rustic White card base.
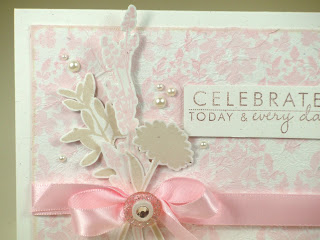
Next came a *lot* of staring at the card deciding what to do with it next! I wanted something subtle and something that wouldn’t hide a lot of the panel, so I eventually opted for some of the blooms from Life. I stamped them on Rustic White cardstock using Sweet Blush and VintageTouch Tea Dye Duo (the flower with both of the duo and the leaves with just the Chai – there is a slight difference if you look hard enough!). I then trimmed out each bloom carefully and arranged and adhered at differing depths using Pinflair Glue Gel.
I wanted to try out a pearl embellishment treatment so messed about with a couple of colours before settling on the Champagne ones. Just enough ‘off white’ in there without being too ‘cream’. I really like the arrangement I came up with these actually, finally something I didn’t agonise too much over! (although I did re-position a few of them a couple of times *sigh*).
After a few more hours of staring (and a break part way through) I finally chose a sentiment and went for one of the ones from Year of Flowers: Daffodils. I stamped it with a light hand onto Rustic White cardstock using Dark Chocolate ink, then adhered very slightly off the panel using Pinflair. I did originally try stamping directly on the panel but I’m glad I settled for this option instead.
So there you go – my journey of pain to produce this card!! Did I do a good job? I really hope so as a lot of blood, sweat and tears went into this one as you can tell if you’ve read my babble!! I’d love to hear what you think of my effort and want to thank you for stopping by and leaving some love if you’ve chosen to do so. I can’t wait to see what you’ve all come up with and I’m sure I’ll see a lot more original ideas than mine when I’m hopping!!


This card is so soft and pretty. I love the background. It is gorgeous.
This is beautiful! You did a great job!!
I think this is just so lovely! You are way too hard on yourself!
This is so soft and beautiful!! Wonderful card!!!
I think your card is gorgeous! YOu did a wonderful job and the faux silk technique on your card looks like a soft pretty toile. Just lovely.
This is so LOVELY!
This is so pretty!!!
I LOVE this Taheerah! It turned out just BEAUTIFUL! (all the blood, sweat and tears were WORTH IT!)
Happy Hopping!
Wow! That's beautiful and elegant and soft and gorgeous all rolled into one card.
GREAT job!
Pretty card, I love the way you used Life and cut out the various images!
Gorgeous card Miss T, so soft and lovely! I love how you cut out those flowers too, it adds so much beautiful dimension to your card!
This is so pretty Taheerah! Love your 'bouquet' of flowers!
Taheerah, it's so pretty! I love the colors you chose–so perfect for your technique.
What a beautiful job you did with this technique — it's so soft and feminine…love it!!
Positively stunning!
WOW! So soft, pretty and beautiful. Lovely colors. Looove your card, Taheerah!
So pretty!
So soft & pretty! Love it!
Oh Taheera I'm going to be caseing you on this, this is beautiful!
Gorgeous background!
Wooohooo – glad you're playing in the hop T! Been thinking about you so much! Your card is absolutely gorgeous I LOVE the colours you used – it is so feminine and delicate!
So delicate and dainty. Way to rock the tissue paper challenge.
It's a good life!
Terri E.
This is such a soft, pretty card.
I think your card is gorgeous! Love the soft colors!
Its beautiful!
OH WOW!!! This is STUNNING!!! It's soft, yet elegant and the colors are perfect!
So pretty! Great job!
love the damask on this and your choice of colours…so pretty 🙂
So sweet and beautiful!! Soft and lovely…great color choice for the softness of the tissue.
Beautiful T! This is so soft and elegant. I love the little pearls you added. Glad to see you posting again. Please dont' make us wait so long next time:)
Don't be so hard on yourself,it's beautiful. I love your faux silk,and if you have never done it you did challenge yourself,and I think that's what this is all about! I love the softness of your card,and I also love how you cut out your flowers and made a bouquet.
Wow, this card is truly stunning! I love the colors and those pretty pearl accents! You totally rocked this Blog Hop challenge!
This card is absolutely gorgeous! The soft colors are perfect for the design. It didn't even occur to me to use Damask Designs for this technique, but now you've me thinking!
This is beautiful and stunning! Love the soft colours and it certainly isn't ordinary in the least!
T, this is gorgeous! I love how soft and feminine it is. I just made a stupid flower – not even close to the faux silk techinque, which I have also never done. But maybe I need to now after seeing yours!
Oh my gosh, you are way too hard on yourself! This card is just STUNNING. I love all the sweet little details. All the hard work you put into shows!
You rocked this challenge! I love this card!
Well it is gorgeous! I love the cut out flowers, the subtle tones, the dainty pearls, it's elegant and pretty!! Awesome job.
I can understand how you were feeling because I had the same problem. I think what you came up with is great though! I especially like the Damask stamped in sweet blush. Very soft and pretty!
Beautiful, T! So soft and elegant! (I think maybe, just maybe you were over-analyzing… not that I've ever done that haha!) It's fabulous like everyone knew it would be!
Well, it's simply STUNNING, I think!!! LOVE it!!!
Your card is elegant and beautiful. Love how it looks!
So soft and pretty! I love what you did with Life – I NEED that set! Love the little details too – the pearls and the sparkly button with the rhinestone! Nicely done!
Oh this is sooo soft and lovely..so glad that you posted it after all! Love the pink background and the beautiful grey silhouttes tied in the bow!
What a journey, but it was worth it. This is simply stunning, so delicate and pretty. I love it.
Hugs,
Caryn xxx
Oh Taheerah, what on EARTH were you worried about? Reading your agonizing journey almost made me cry…you poor thing! All worked up for that? Your card is incredibly lovely and VERY clever. I cannot believe how pretty those flowers from Life are when cut-out. Superb. And your bow/button treatment is gorgeous. I actually LOL at your inked edged dilema…so many layers just to get the effect we want! THAT'S a true artist!
Gorgeous. Simply gorgeous.
And you thought your card wasn't worth posting!! What a soft and gorgeous card! I love the faux silk technique!
Well Miss T, I don't know why you were struggling with this card… it is gorgeous! Really beautiful! Oh and welcome back to blog land!!
So soft and beautiful!!
Kara
That is gorgeous!! LOVE it!! It is so soft and pretty! Your "pain" was worth the end result!